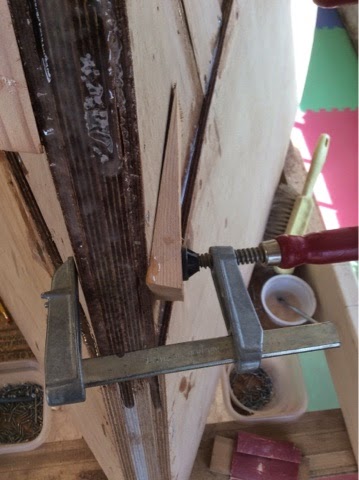
Gluing up the outer stem from two true 1x4 Philippine mahogany. Probably $50 or more of wood. I wanted something extra hard facing the world. A brass half round will go on the outside. I also scarfed the two guards. They are one and a half wide by 7/8 thick and at this point about a foot longer than the boat. A little clean up and a cut to length and they will be ready to attach.
Monday, April 27, 2015
More glue up
27 April 2015
I used this little Dremel saw to cut all the quarter inch (6 mm) pieces. I liked the weight and ability to see the lines I had laid out. I am sure I will use it a lot in the future.
A vase I threw and glazed (random pic).
Friday, April 24, 2015
Let's glue
25 April 2015
I started gluing in the past week. I was off for a few weeks of vacation and such and wanted to wait for some consistently warmer weather. I found I could do few feet in an hour, so did the inner 6 mm layer evenings in the course of a week.
I am using West System epoxy. I did three 'shots' at a time using the fast hardener (it's about 50 degrees F in the shop this time of year) and added a few scoops of 403 microfibers. In my hands at this temp, I found that 3 squirts worked for me. I used a small brush to coat each edge and to paint about 3 inches on either end. I wanted to make sure I had epoxy on any surface I was not going to see again on the inside near the hog or the chine.
I started gluing in the past week. I was off for a few weeks of vacation and such and wanted to wait for some consistently warmer weather. I found I could do few feet in an hour, so did the inner 6 mm layer evenings in the course of a week.
I am using West System epoxy. I did three 'shots' at a time using the fast hardener (it's about 50 degrees F in the shop this time of year) and added a few scoops of 403 microfibers. In my hands at this temp, I found that 3 squirts worked for me. I used a small brush to coat each edge and to paint about 3 inches on either end. I wanted to make sure I had epoxy on any surface I was not going to see again on the inside near the hog or the chine.
First afternoon's work.
I used a couple of small blocks and planes to get even pressure on the sheathing where it meets the inner stem.
Close up of the blocks. They helped a lot to bring the edges in tight to the stem.
Another shot showing the placement and number of screws. Many of the screws ended up in regions where I applied epoxy. I would/will not do this again, as many of the screws got set in ways unintended.
I keep a list of things to get on a white board in the shop.
The photo below shows all the pieces from one side. One inner and one outer layer.
The first inner piece.
Ready to glue.
Ready to take off quarter inch pieces before glue up
The view below shows the hog and the inner stem. I've planed down the two layers on each side to meet the hog. You can see (sort of) the modest undulations and varying width of the hog and sides. I found that if I went for tight plane, I ended up with sides that curved in and out. If I kept the sides of the sheathing parallel I risked going too deep into the hog. This is definitely something I could improve upon with some practice and greater patience, but best not to overthink I say and learn by doing...
You can also see where I took a nice chink out of the repair to the hog where it meets the stem. Not a pretty sight. The lines of the boat however are starting to emerge and they are very nice indeed.
More prep work in bringing the sides and the hog into a consistent plane in prep for gluing and eventually the keel.
I discovered that a 1 inch half round for the boat would be about $400. I can live with that, but the shipping cost from Rhode Island to my home in Plymouth (about a 1.5 hour drive at most) would be >$700. So I will be taking the pickup to Rhode Island before too long on a visit to Jamestown Hardware. At least they have it...
There are several hundred holes to be countersunk, so I was happy to have an assistant. At this point all the pieces for both layers have been dry fitted and all the holes countersunk. We are taking out the screws in prep for the glue up.
A funny angle, but the plywood forward of the rear sheets is all off. Some more support for the plywood pieces closer to the stem would be helpful and reassuring. Woodyboat21 added another piece (I believe before he attached the chines to the inner stem) on either side and I wish I had done the same. I will add some additional support after I flip the boat and before I epoxy the insides.
More of the same. The angles of the hog are much nicer looking in person.
Stem prep
25 April 2014
You can see the results of my first pass on planing the two sheets of 6 mm plywood and in particular the transition near station three. I ended up taking some of the 'too close to the edge screws' out and did a modest amount of clean up. One could spend an infinite amount of time here. The
I labelled all the pieces.
I put quite a number of holes in each piece in preparation for the glue up. I decided to use plain old Home Depot #8 screws even though I had a few boxes (read a few hundred dollars worth) of #6 and #8 silicon carbide screws. Using the cheapo screws was a bad decision. After the epoxying the inner layer I found that the head twisted off about 1 in 20. If I used the silicon carbide I'm sure they would have stood up better to the torque from the wrench. I countersunk holes along the edges and the middle of the outer layer to make sure
You can see the outer 6 mm pieces (the third, fourth and fifth from the stem) in the photo below. I've planed down the two layers so that they meet the bottom of the hog. I warn all future builders that it is very easy to take too much off the hog and top of the planking and cause a local dip in the plane of the hog where it will meet the keel. I have not attached the keel yet, but I foresee some kind of filling in of a few modest, few millimeter, swales in the hog. I will either epoxy in some sort of sacrificial piece that I can plane more carefully and evenly, or I will attempt to fill in with some epoxy.
Working to get the stem in in a single plane perpendicular to the center line of the boat.
A work in progress.
Still in progress. The bulge in the sheathing on the left side of the photo was more prominent than I would have liked. In the glue up I used some clamps to better align and clamp to the inner stem.
Bottoms up
This is a view of the two bottom sheets from the stern looking forward. I used the power planer to put a slight edge on one of the sheets and so not leave a big gap between the sheets. Probably could have done a better job here and put two, more-cleanly joining edges, but hey...it's the SloppyCopy.
Once I epoxied and screwed in the sheets the gap was small and the two sides met quite nicely.
Tuesday, February 24, 2015
Hog it
24 April 2015
I am **way** behind on this blogging thing, which is a shame because I'm sure to leave out lots of build details. My beloved Boston Bruins have alas left me an entire Spring clear of any cheering obligations. Perhaps I can get one of the Bruins to put down their golf clubs and help me build the boat -- they've got plenty of free time.
As you can see in the accompanying photos, I was working on planing the hog. The power planer made a huge mess and a lot of noise. Not my favorite tool. If I didn't have a job I would do all this by hand -- good exercise. To get a decent view and better control of the planer, I put some old stair treads on milk crates and made a platform that ran from stem to stern. I wish I could say I got each curve just so, but the reality is that I got it pretty close and will be relying on the epoxy to fill the gaps. I'm not convinced that more care and time spent would have resulted in any significant difference. I'm just not that skilled and the multitude of intersecting planes and angles are tricky enough to keep my constantly guessing on how well things fit. I'm sure it could be better, but I'm also sure it will be plenty strong enough and not to 'gappy'. A huge fraction of the hog comes off. If I were to do this again, I think I would cut the hog on my band saw before I put it on the boat.
Another view of the hog. I attached blocks to the form so that I could then employ my old steel C-clamps. I bought a few buckets of these clamps in an estate sale. I'm sure the old carpenter would be happy to seem them put to such good use.

Still another view. You can see that the lines are not perfect. I did fine tune after this.
I figured out a bit later in the build that my shop vac would plug right into the planar. Shame on me for not figuring this out sooner. I spent an entire afternoon after the hog planing incident cleaning up all the surfaces in the shop. I don't think I'll ever get it all out of the shop. You can see the fraction of wood planed off in the picture below.
Plane
25 April 2015
The photo below shows how I put the temporary screws holding the sides of the boat to chine too close to the edge. I discovered this goof, too late, when I worked the angle of the chine in preparation for the bottom plywood. Not the end of the world, but something to avoid.
In the photo below you can see the rough glue up where the side panel and chine meet the transom. Lots of interesting angles to resolve here before the bottom sheathing goes on.

A phot showing the tolerance I accepted when a straight edge was laid down on the form. There is a bit of a gap where I have taken a tad too much off the chine and side. All these goofs will be underwater thankfully and out of sight from the Woods Hole boat building editorial staff.
Another view of the rough glue up looking from the transom forward. Time to start planing this in prep for the bottom sheathing.

I have no idea why I took this picture of the bottom of the planer. I think I was trying to convince myself that I had not destroyed the planer blades when I trimmed off some screw heads.
A photo showing the beginning of the line I established to accept the bottom sheathing. You can see all the record-breaking snow I had outside. You can also see one of my two little electric space heaters. I managed to run up a $600 electric bill in one month. That was unexpected and unfortunate since the room never got above 50. I was essentially trying to melt all that snow. Next year I will look into getting a propane heater installed. I like this shot too because you get a sense of the line that Doug Hylan has established in the hull.
Subscribe to:
Posts (Atom)