8 February 2015
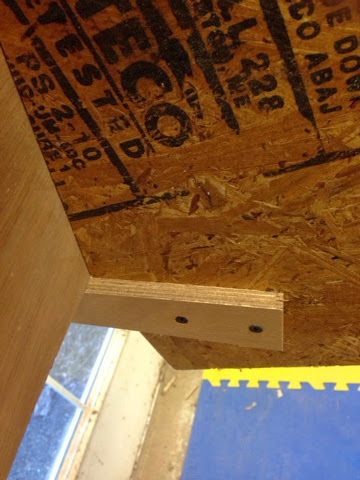
Some notes on attaching the side panels. I attached little blocks, like the one seen below, at each station. I found in the end though that clamping the sides in place was necessary to get the position where I wanted it. They did help though when I was working alone and didn't want to take the whole panel off. I used the build photos from DH to give myself a sense of where on the chine the panel should align. It looked nearly flush with the top of chine (top relative to the floor) at the stern and then gradually the space between the top of the chine and the edge of the panel grew as the panel went forward. This pretty much has to be true to accommodate the ever increasing angle of hog to chine as you go forward. I more-or-less used the intersection of plane of the bottom to the top of the panel as a means of figuring out where the final glue up position should be. The DH build photos may be misleading. I looked at the plans as well, but didn't use them to do any mark up. Time will tell...

I beveled the edge of the transom (which has the screw head visible below) so that the side panel lands flat. I also sanded down the chine so the intersection of the chine, panel and transom all met without leaving big gaps. Clamping the side panel to the transom was near impossible, so I relied on a series of 1" #8 silicon bronze screws.
You can see some planer marks below that I sanded out with 60 grit paper.
In the photo below you can see where I started to bevel the leading edge of the side panel at the stem end so that when I made the final glue up I ended up with a plane that was perpendicular to the center line. I made a nice gouge at the top of one panel with the power planer. Go SloppyCopy.
The brace holding the stem got in the way of the side panel glue up, so I attached a piece of wood spanning the bottom of the ladder and then attached with some screws short pieces of wood that kept the stem from moving laterally. No very pretty, but it worked.

I also discovered that I had to plow out a window in the ladder to accommodate the side panel so that I could attach it to the stem. I just made a series of scarf cuts and banged them out with a hammer. Good kindling.

More dry-fitting. The panels went up and down several times as I found things to fix, like excess epoxy at the joints, or spots on the frame where I had inadvertently left some of the CNC-cut tabs.

Epoxying the second panel done! I was more careful about where I screwed in the 1" #8 screws on this side. They're a bit lower (closer to the floor). I suspect that I will be removing some of the screws on the other side because the heads will be in the plane I need to establish on the chine to accept the bottom. Nothing some epoxy and filler won't amend.
Time to start planing the hog and chine.


Hi Greg, happy to see that you're making good progress. As promised, I catched up meanwhile - today I was beveling one side of the chines and the hog. On the weekend I will update my site. By the way: I ran exactly into the same pitfall with the ladder frame :-)
ReplyDelete